1.
3 MarchYes, yet another person who is obsessed with Tudor and Elizabethan costuming. I'm probably not the best person to look at out there... however, I can redirect you to some really great people! I'm currently wrestling with a 1535 (or maybe 1545...) gown, but I haven't really gotten past the underpinnings yet! So far constructed are my chemise and my corset. My farthingale is almost done... I cut out the fabric and sewed the panels together! I just have to make a waistband and insert all the boning casings... I'll get around to it in my "free time". Hopefully that's sooner rather than later!
7 MarchIn case you were wondering, I hopefully will get some pictures up of my costume, just have to upload them from the camera. Scanners can be limiting sometimes.
Wahoo! I finally worked on my farthingale yesterday. (Some of) the boning casing for the bones is in! Again, pictures are coming soon... I hope good things will happen with the digital camera.
31 MarchWahoo! Vacation! On Friday, I decided to make my stupid corset front lacing because it was impossible to lace by myself in the back... I'd like to see someone else try. So, I got it done, but the way the boning was placed (it wasn't entirely my fault, I used a commercial pattern) it didn't do what a corset is supposed to do; that is to create a slightly conical silhouette. It was, I decided, because the boning in front ran horizontally, not vertically. Basically, I got disgusted with my horrible job (it not only didn't work right, but dug into my waist no matter what) and decided to make an entirely new corset, from Drea Leed's wonderful Custom Corset Pattern Generator. So far, I made the patttern, cut it out, sewed it together, made my dear mother iron it (I'm iron-challenged, and extremely clumsy - don't let me near anything hot and/or sharp), and sewed in all those boning channels - I think it took nearly two hours to mark out all those darned things and sew them in (there are somewhere around 40). Right now, I'm going on an accurate boning kick (at least somewhat) and decided against using the plastic I used last time. This time, I'm using "bents" - reeds - from Grannd Garb. It's kind of cool because their location is really close to where I live - I could almost just go get it, but, unfortunately, they're closed for vacation until April 8 - exactly when I go back to school! I'm using spring steel bones for the front - I don't want an actual busk because the corset is front closing. At least I did all the hard parts first. At this point, I only have to cut and insert the bones (how hard can that be?) and sew the top closed. Hopefully, fairly brainless, and hopefully, a decent corset that fits and is comfortable - this one now has boned tabs... ahhhh, comfort. Anyway, while I'm waiting for my import, I'll hopefully finish up my farthingale... goody!
1 AprilYup, I finished up the farthingale yesterday, just a few finishing touches are left! Also, the pictures have arrived.
1.![]() 2.
2.![]() 3.
3.![]() 4.
4.![]() 5.
5.![]() 6.
6.![]() 7.
7.![]()
All right, some explanations, I think, are necessary. Starting from the left, the pictures are:
1. My chemise, on the dress dummy. I don't actually use the dress dummy for anything but modeling clothes on: it's not my size! The chemise is made of muslin (not period, I know: they would have used linen! However, there are bolts and bolts of it at my house, and the fabric for the dress was cost enough. I'll get to that later.
2. The Corset, with the boning channels sewn in, folded over for an approximate view of what it will look like when done.
3. The Corset, also with the boning channels sewn in, but lying open. See the funny little pocket things on the bottom? Those are going to be my comfort-adding boned tabs.
4. Yes, that's me in the farthingale. It's a really horrible picture, especially with the cat (oh, my dear Fluffy) and I myself am not especially photogenic. Oh, well.
5. That fabric (though the color match isn't exact - I couldn't figure out how to turn the flash off, so bear with me) is going to be my forepart and undersleeves. Maybe I should draw you out a diagram of typical Tudor dress... umm, later.
6. The fur (again, a bit off) is eventually going to be my sleeve lining, so when they are turned back, I look like I can afford to wear some poor animal's skin (don't worry, I am only a fake animal killer, not a real one).
and 7. The fabric for the main body of my dress - bodice and overskirt, etc. The color is also a bit off, but it's a documentable color from around the time period (i.e., it was in someone's wardrobe account) and it's called Light Tawney. Fun, huh? Whew! that's a mouthful. I think I got everything.
2 AprilMore news! My shipment came in early! I thought they were on vacation... oh well, I'm happy, anyway. I now have my reeds and an awl (for poking holes to make eyelets), and many other things, so I can finish up my corset! I think I'll do that tonight.
You know what? I've decided, instead of finishing my corset, to devote tonight to explaining a little bit about Tudor/Elizabethan costuming to you. I think I'll describe layer by layer... first was the chemise/smock/shirt, a long shirt-like garment (it could fall anywhere from mid-thigh to ankle, depending on taste and gender) which was worn under all the clothing to protect it from sweat, body oils, and the like. Next comes the farthingale, which, in the time period I'm working with was what was called a Spanish farthingale: a skirt which spread out in a sort-of bell shape (but wasn't bell-shaped, it was A-line), and was supported by any boning material that you'd like; whalebone or reeds were common at the time. On top of that is the corset, a garment which was not supposed to tighten your waist but to smooth the torso into a slightly conical shape. That illusion of a small waist was created by the bumroll, a slightly disputable garment, shaped, well, like a roll, tied slightly below one's waist. Optional at this point: petticoats. Above this goes your forepart, which is what shows through your overskirt if it's split in the front. It should be heavily decorated, or at least contrasting to the rest of your gown. Optional now (depending on your time period) is the partlet, that can fill in the low neckline of your gown, but is usually of the sheerest fabric you can afford (in the 1530s-40s. Later, it was more opaque and liberally blackworked). Finally, over all this, comes your gown! You can read instructions that are a lot more coherent at Putting on an Elizabthan Outfit. Hmmm... that only took fifteen minutes. Perhaps I'll work on my corset after all...:)
3 AprilWell, the reeds are currently being stretched out - they're all curled up from packaging. However, I made you all an extremely simple, and sadly rather messed up, diagram of simple Tudor/Elizabethan dress. Here we are. 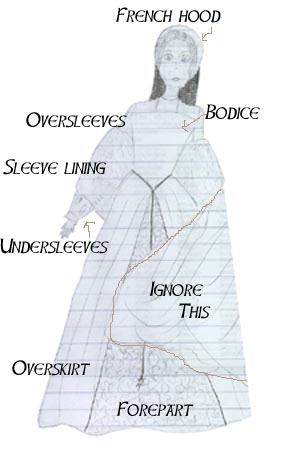 The part that says "ignore this" is there because this came from a page of doodles/sketches and this dress happened to be underneath another one, hence some of the skirt was superimposed (is that a word?) on the picture/ diagram that I made. This is a gown, not underwear. Don't look for any of the stuff I haven't made yet.
Later 3 AprilThat was fun! I got bored waiting for the reeds to straighten, so I just decided to cut them up and stick them in the casings anyway. I have a lot extra, so I think I probably meant (when I ordered) to put four reeds in each casing, not three. Hmmm... I think I'll decided what to do when the reeds are flattened out - the corset is under piles of my mom's old computer programming books. I'll take them off in a week or two.
5 AprilWow, I feel really pathetic. For the past two or three days, I've been making this program thingy (it uses a script that only works in IE and I think it's kind-of okay, though pretty messed up. What it does is this: it has a few pictures of different elements of Tudor/Elizabethan dress (for now, bodices, skirts, and the basic underpinnings) and you can mix and match them to make a cool noble gown. Ladies and Gentlemen, introducing Mix-and-Match-A-Gown!
8 AprilWhew. Last night, I sewed a peach colored ribbon on the top of the corset to 'seal' the bones in. Straps are coming later, after I lace the thing on and know where they should go. The ribbon is really wide, so I'm just going to use one width of it for straps. The reeds are still a little curly, but that's okay because the boned tabs have to curve out a little bit in order to take the pressure away from my waist. As of now, I have made one eyelet for lacing. I'm making them the period way: poke a hole in the fabric with an awl, just widening the fibers out without cutting them, then doing buttonhole stitch around it. Now, I can't exactly do buttonhole stitch, so I'm just overcasting (I think that's what it's called) the edges. Or maybe it's whipstitch. Either way, it looks good, and I'll make the other ten or so (maybe it's fifteen, I have no clue) later. I think one a day is a good goal: schoolwork is currently getting piled on me. Just for reference, today's buttonhole took about 20 minutes to do (that includes fixing the stupid thread which kept knotting up). Let's see if I get faster... this is starting to sound like a science experiment we did a few months ago...:).
13 AprilOkay, last night I finished binding all of the little hand-bound eyelet holes - let me tell you, afterwards, my fingers were really, really sore. And that was only after doing about 3/4 of the corset - I had done the rest before. There are about twenty holes, they are all done, and the last one took between five and ten minutes, around midnight. By the way, I figured out how to do buttonhole stitch. This morning, I tried on the corset over the chemise and farthingale, and I think it looks pretty cool. A funny side note: the shoelace thing that I ordered to lace the corset was too large to fit in the eyelet holes, though just barely, and I had to find (and use) the narrowest ribbon in the house, which was purple with white polka dots! However, it actually threaded through the eye of this really big needle we have, so lacing was extremely easy. I think I might buy a different ribbon, and I still have to put on straps, but I think I'm almost done! Next comes the bodice - oh, so much fun! The skirt should be a little easier, but I've never done cartridge pleating before, so it should be fun...:)
∴ Home ∴ What's New? ∴ Spinning ∴ Weaving ∴ Historical Costuming ∴ Dollmaking ∴ Embroidery ∴ Links ∴ Contact Me ∴
Please feel free to inform me if you have any questions, comments, suggestions, typographical errors, or broken links to report.